The current trend among players and manufactures is to push the technological envelope. Higher rates of fire, electronic triggers, and faster loaders. All are a waste of money if the basic player skills are inadequate or missing all together. Poor marksmanship or shooting skills can turn an Angel in to an expensive noisemaker.
H.A.B.I.T.
Good shooting is a HABIT. Proper Holding, correct point of Aim, controlled Breathing, Instinctive body position, and gentle Trigger control. The basics must be mastered before you can move on. Learn the easy, and then move on to the complex.
Holding your marker must be firm enough to support it, but must not be so tight that you are straining your muscles. When you strain your muscles, they start to shake. The result is that your marker will shake and this makes aiming more and more difficult. When supporting your ‘gun, it is your goal to make a triangle of bone. The human body is the worst weapons platform that can be designed, so we have to work with what we’ve got. Our aim is to turn our bodies into a truss or scaffold of bone so that we use as little of our muscles as possible.
Aiming at a target isn’t as simple as pointing your marker in the right direction & hoping for the best. There are two factors to consider. They are distance, and wind. A paintball falls under the influence of gravity. When we don’t aim up enough, the ball falls short of the target and misses. The farther away the target is, the higher up we have to aim. Therefore accurate judgment of the distance becomes critical. Practice on the range helps out here. Wind can blow a ball off target. The faster the wind, the more the ball gets blown off target. Again, hit the shooting range. When shooting at a target, soldiers, police, and other law enforcement agencies are taught to shoot at the “Center of Visible Mass”. Simply stated, it means shoot for the middle of what you see. On a person, if you can see their whole body, that point is roughly in their stomach. If all you can see is from the waist up, then the center of visible mass is in the middle of the rib cage. Shooting for the middle of the target gives you the highest possibility of making a successful elimination. That’s the goal of proper aiming.
Controlling breathing serves three purposes. First, it supplies the body with the Oxygen it needs. Second, proper breath control helps you fight “Buck Fever” and keeps you calm. Finally, when done properly, proper breathing ensures that you have the same chest size, so the shape of your body is always the same.
The eye contains a large number of specialized cells that are designed to detect light and transfer that information to your brain. This process takes a lot of oxygen. When the body goes hypoxic, a lack of sufficient oxygen (O2) in the body tissues, one of the first symptoms is blurred vision. In order for the muscles to function, they burn sugar and O2. In order to keep an adequate supply of O2 in our bodies, we have to breathe properly. The tendency of the shooter is to get excited when they have their target in their sights. You get excited and start to shake. Relax. When we breathe, our chest expands and contracts moving our arms. If we are breathing in and out, as we pull the trigger, the marker will not be aligned with the target, and we miss.
So breathing control is simple. Take a couple of deep breaths. This will relax you and saturate the blood with O2. When you are ready to pull the trigger, take a deep breath, and exhale half way. Be careful that you don’t hold your breath for too long, or your vision will start to blur and you’ll have to start all over again. Always exhale the same amount. Stay consistent. We don’t like gas pressure changes in our guns, so why should we accept them in our own bodies? Watch your sights rise and fall. When all the pieces fit together, at the point where you exhale and hold your breath, you should be pointed directly at the target.
Instinctive body position is just getting comfortable. The more comfortable you are, the less muscle pressure you have to use. There are four basic fire positions that must be mastered in order to be effective.
Trigger control is one of the hardest skills to master in marksmanship. When the trigger is pulled properly, the marker will not move. Often missing your target to the side is the result of poor trigger control. Straining against it causes vibrations that shake the ‘gun off target. Jerking pulls your aim off to the side. The trigger must be pulled gently back in line with the body of the marker. Mentally draw a line with your finger from the trigger to the back of the grip. This will keep your pull in line and under control. Practice makes perfect.
Range Practice:
When training on the range, wear the clothes and gear you play in. All of it. Goggles included. Aside form the safety aspect, get used to them. Know how their construction affects how you work with your marker. In the military, they have a saying. Train like you fight, fight like you train. Make your training environment as close to what you’ll be playing in as much as possible.
Grouping and zeroing is the process of setting up your sight and working on your technique. Grouping is firing a series of shots all aimed at the same location. Where they hit on the target is irrelevant. The important part is the size of the grouping. When your shots are consistently in a small tight pattern, it is a good grouping. It proves your marker is set up well, and your paint matches your barrel and you are practicing the principles of good marksmanship.
Grouping is best done in the prone position. Fire five slow, deliberate shots to the same point of aim on the target. Concentrate on your Hold, point of Aim, Breathing, Instinctive position, & Trigger control. When you’re done adjust your sights, according to the manufacturer’s recommendation, to the center of your cluster of hits. Repeat the process. Group five shots, move your sights. Take your time. Time spent setting up on the range will make things flow smoother on the field. Make several small corrections rather than one large one. This will mean more groupings, but we can always use the practice.
When practicing, rarely will you ever have an experienced coach, so it’s up to you to interpret and diagnose any problems you are having with your technique. Self-critique isn’t as simple as “I hit” or “I missed”. The pattern of your grouping tells a story. It will tell you where your problem areas are. There are three areas you can work on by reading your impacts.
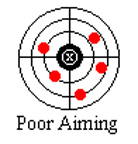
Point of Aim – Rounds land off target or your grouping is large. Fix this by keeping your point of aim constant and by concentrating on the basics.
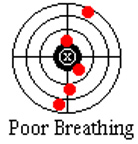
Breathing – Rounds land in a vertical pattern. Fix this by exhaling the same amount every time. If necessary, exhale completely for a consistent breath.
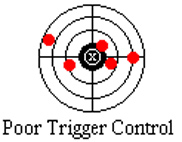
Trigger Control – Rounds land horizontally and spread out. You are pulling your marker to the side or jerking the trigger. Use your finger and draw a line straight back to your eye. This will keep the marker in line and on target. Taking the time to think about that line will prevent you from hastily jerking the trigger.
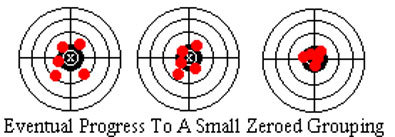
Eventually, with practice, the area of your groupings will get smaller, and smaller.
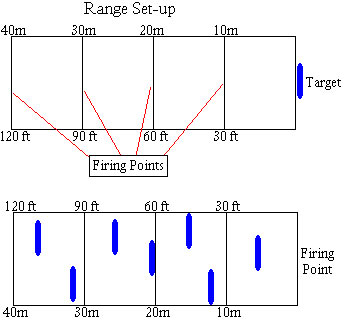
Close Range 10 meters (30 feet)
This is where you master the basics. You will fire easy shots to work on your skills and increase your knowledge of your marker’s performance. Your goal is to fire one perfect shot. Then, fire a series of perfect shots. Work through all the basic fire positions and own the technique.
After you have mastered your technique at short range, increase your distance in known increments. This will work on two critical areas. A) Distance Shooting B) Judging Distance. After working at various distances you will have a mental measuring stick to help you judge distances to your points of aim to hit those targets. The last step in distance marksmanship is practicing at unknown distances. Place your targets on the range at various random locations. Practice shooting at the targets in succession to develop your estimation of ranges and points of aim. This will also train you to engage multiple targets and come out on top. Practice on calm days as well as windy days. After all, the weather doesn’t always co-operate with our own playing schedule.
Training yourself is an upgrade for your brain. The most effective piece of standard player equipment on the field. Once mastered, the basic principles of marksmanship will be a part of you forever. To keep your edge sharp, practice consistently. This is something you can work on in the off-season, or between games. It keeps you in the game and a more useful part of the team when you hit the field. Stay sharp.
Ghost